Here's are pics of the south wall in its early stages.

These photos were actually taken in March, and I'm just now posting them, because I want to keep the project all together so you can see the progress. And it was progress, even though it didn't always seem like it.

Jay put up tongue and groove beadboard that will be the backs of the cupboards.

The dog hates the air compressor and nail gun, but I worked with him, using
It's Me or the Dog techniques (Animal Planet, people) and a lot of cheese, and now it only takes me pointing at him to keep him quiet. Pretty cool.


I selected one of the colors that are in my two-tone parchment walls for the beadboard. I didn't want the color to distract the eye from the items in the cupboards - and there will be a variety of colors.


Pam Crooks and her hubby gave us several cupboards when they remodeled their kitchen. Jay removed the doors and went to town refurbishing them. They'd be white anyway, so paint didn't matter. We figured out how to space them across the wall - leaving open spaces which he could then later fill in.

It seemed like we painted and puttied forever, coat after coat. He had already filled the holes where hinges were. And sanded. And sanded.

Here's Jared putting one on the wall. Everything's a major decision - how high? how low? What kind of doors do we want?

i knew I wanted the doors to look like those on an old cabinet - in fact we had my dream pictures to work from.
SCROLL DOWN FOR MORE
 Since you're here, you can now see the finished top section of the china cabinet wall above. Awesome, isn't it? Here are a couple of pics of Jay putting the latches on the doors. There are plenty more pics, and I'll get those up soon.
 These photos were actually taken in March, and I'm just now posting them, because I want to keep the project all together so you can see the progress. And it was progress, even though it didn't always seem like it.
 Jay put up tongue and groove beadboard that will be the backs of the cupboards.
 The dog hates the air compressor and nail gun, but I worked with him, using It's Me or the Dog techniques (Animal Planet, people) and a lot of cheese, and now it only takes me pointing at him to keep him quiet. Pretty cool.

 I selected one of the colors that are in my two-tone parchment walls for the beadboard. I didn't want the color to distract the eye from the items in the cupboards - and there will be a variety of colors.
 Pam Crooks and her hubby gave us several cupboards when they remodeled their kitchen. Jay removed the doors and went to town refurbishing them. They'd be white anyway, so paint didn't matter. We figured out how to space them across the wall - leaving open spaces which he could then later fill in.
  It seemed like we painted and puttied forever, coat after coat. He had already filled the holes where hinges were. And sanded. And sanded.
 Here's Jared putting one on the wall. Everything's a major decision - how high? how low? What kind of doors do we want?
 Pam sent me a picture of these cabinets when they were in her kitchen.
 Lots of painting.
 Here they are fastened to wall, but with gaps between. There was more wall than cupboards that would fit evenly in the space.
 So then Mr. FixIt does his magic and gaps the space between.
 As soon as the top board and trim go up, they'll blend right together.
 Here I'm painting the top board and he's figuring out the filler and trim.
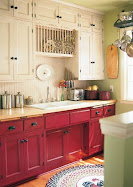
 A Western Winter Wonderland: Christmas Day Family\Fallen Angel\One Magic Eve (Harlequin Historical Series)
 The Tenderfoot Bride (Historical Romance) (Historical Romance)


