Thursday, March 20, 2008

Progress on the Window/Wall/Shelves

Not sure how to title this exactly. This is where a doorway once was. It's now recessed shelves for my vintage spice tin collection, and a transom window to let light through to the living room.
It's looking better and better!
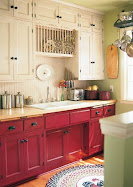
After I saw the window in there, I thought I should have stained that wood green instead of red. Coulda, shoulda, woulda, ya know?
Jay scraped and sanded the window frame, but I don't think I'm going to paint it/ It's really cool, with old crazed paint. Yeah, I'm crazy like that.

Sunday, March 16, 2008

living room side of old doorway

WAY BEFORE
Here is the living room with a cabinet in from of the doorway.
This is the same doorway as seen from the dining room on the other side.
The one that is now drywalled over


Here you can see through to the dining room.


It was an arch, but they took that out and made it into an opening for a transom window and filled in the rest.


And all the work is happening in the kitchen, so this still looks pretty much the same except the wall has been patched, there's woodwork around the kitchen doorway, and the wall is ready to paint.

BEFORE AND DURING

This was taken from the living room looking toward the stairs and kitchen doorway. The doorway is now a lot wider. The banister has been removed, carpet removed, old tile removed, and new steps are in place of the old ones.


This after the bigger hole was cut.

Saturday, March 15, 2008

Are we having fun yet?

Here's me sanding the wall that goes down to the family room.


I have good news and I have bad news.

The good news is we're finally to the painting stage! We're getting COLOR!

The bad news is this wall goes all the way down THROUGH the family room, so that whole room will need painted as well.

And here I am painting my parchment colors.

I use a double-headed roller and with two colors and then a big sheepskin to dab it evenly.


Who's idea was this anyway? The corner and around the doors are especially fun.

The wall shelves

Sing to Rick Springfield's song: I've got a hole in my wall!

But, hey it's level.


So then he puts some beadboard stuff in the back after I paint it.


And then I stain the shelves red. Red wood stain, you ask. Yeah, I'm crazy like that. Wait until you see the finished product before you gag.


And I tried to get a picture of the wall color - it's parchment-looking and took me forever. Pictures of that process are coming, too. Cause I know you haven't seen enough yet.


Here's Jay sanding the window that will fill that hole.

Cool pic of all the crap in the air, huh?

The West Wall

This wall used to have a doorway from the dining room to the living room. We left an opening for a transom window, which will be over an antique cabinet in the living room and allow morning and mid-day sun through. Below it here on the kitchen side are recessed shelves being built that will hold my vintage spice tins.

Here, Jay is putting primer on the wall. We looked at pieced-in and bare drywall for a REALLY long time. This is a big moment.


You can see the old wall here - the wall that was in the dining room and the wallpaper border ran out behind the hutch. LOL It was fine when there was a hutch in front of it, but I looked at it like this for MONTHS!


This picture is jumping ahead a little, because here you can see the recess shelf project coming together and the bottom wall color. The top is still primer and there's a space (the blue tape) for a chair rail.

Also note Jay's new sturdy ladder, which I made him buy. Last summer he fell off the old one and broke three ribs.

west wall destruction

WAY BEFORE
This is the west wall of the dining room before the wall came out.
There was a doorway behind this hutch.


Here is the doorway after during destruction.


Now the space is getting put back together.


And drywalling over the hole except for a window space.

ENTRYWAY FLOOR

Inside the front door was this awful BROWN tile. Can you say REALLY UGLY?


So Jared chipped off all the tiles with a hammer and a crowbar


and then Jay chopped the little pieces and glue with a chisel.

The new flooring now goes smoothly right from the kitchen to the front door.

The Essential Tools

A hammer, coffee and chocolate. Duh. Everybody knows that.

The Floor

THE DILEMMA: This was previously two rooms. One is carpeted, the other is wood laminate. The three-year-old wood laminate is now obsolete. So much for being able to buy more and piece it together somehow. Behind Jared you see the old cupboards on the original kitchen side. (They are still a work on progress.) You can also see the can lights.

So, the old flooring and carpet has to come out.

That was fun. Here's they're looking at where the doorway was between the two rooms.

Then the dining room side needed underlayment to bring it up level with the kitchen side.

Jay and Jared removed the old flooring and carpet and put down underlayment in a day.


This was under the laminate flooring. Bet it was ugly even when it was new! Yuck. Brown!


Then you have to lay down this foam plastic stuff under the new flooring. I got to help with that.


I'm probably saying, "THAT was under the stove!?" CLICK TO ENLARGE THIS and you can see whatever the kids are watching on TV down in the family room! LOL

The new floor is called ANTIQUE OAK. I think.

TWO BUTTS

This picture just makes me laugh.

Floor Continued

CLICK TO ENLARGE

The underlayment going down


Jared is doing the piece at the top of the stairs that go down to the family room.


The color of the new floor. It's distressed looking. Of course. Sort of like us when we look at the mess.

Replaced the front stairs

Murphy's Law: Everything you do leads to something else you have to do.

The old carpet and entryway tile had to come out - also removed a banister. So there were holes on the steps and yada yada.
The guys ripped off the carpet to see what they could do. We had this idea of removing the carpet and staining the stair treads and painting the risers.


Well, of course the old stairs were just gross and pieced together, so the guys decided they had to go. I was doing dishes and Jay said, do you want to be up or down?

PHOTO: JARED WORKING ON STEPS


By the time I was done with dishes, I was down. There were no stairs. So I went shopping and picked up Elijah from school and we went shopping. I mean it's not like I could get to my desk to work.


The new stairs are solid and great. One teeny weeny thing we didn't anticipate: They are NOISY. I mean NOISY. Thump thump up and down.


They worked really hard on the stairs and they're great -- but......


Photo: ME, LITTLE JARED AND ELIJAH


...we thinks we'll be gettin' carpet on them. I'm all about comfort.

The ceiling project

The ceiling was a huge job. Jay worked on it many evenings and a couple of weekends. Since the space was originally two rooms, they had to make the two sides even and match. There was a gaping hole where he and Jared cut access to the attic and Jared wired all the new lights up there, and then they put in more insulation.
Also, a big ugly recess hole where they removed ugly flourecent lighting had to be framed over and filled in.
CLICK ON THEM TO ENLARGE PHOTOS
And me being me, I really liked the rough look of the patched places, so I requested the texture be covered over and the ceiling made to look like plaster.
Jay is my hero because he made it happen. I really love it. He and Jared put in can lights and a fixture over the island.
We are in disagreement over the old ceiling fan. I was happy to see it go. He put it back up in a different place. But he did say last weekend that he knows he's already lost the battle. Guess I'll be fixture shopping.

LIGHT FIXTURES

This is why our kids think we're nuts:
We take down new light fixtures and replace them with vintage ones that sometimes, okay usually, have to be rewired. This is one we found a long time ago while browsing at an antique mall. It was under our bed for months, and now it's above the island (we're using the antique sideboard for our island - it has a marble top) and it's awesome. CLICK TO ENLARGE PHOTOS and you can sort of see the ceiling effect.


This one is in the living room. We found it at a rummage sale in a small town nearby. The young couple who sold it to us removed it from their home to put up a modern one. I think we stole it for something like $25. It's porcelain with roses painted on it.